Archive for the Category Articles


Setting Wing Incidences

Here is the Gieco Caveman style How-To on setting wing incidences. This is step #22 in the Carden manual for the 35% 260. This step gets about 1/4 of a page. Its not complicated or hard but it is something you have to plan out.

I’m going to assume that were starting with the wing tube socket installed (step #21) and the wings are done with the leading and trailing edge stock installed and sanded to shape.

First we are going to do all of the drilling that we can on a drill press. Drill 4 of the square mount pads and all 4 of the rectangular mounting brackets dead center with a hole sized to the diameter of the bolt your going to use. Carden suggests using 8-32, I’m using 4mm. With the remaining 4 square pads drill a hole for the blind nut, again dead center.

IMG_0864 (by gareth.ky)IMG_0866 (by gareth.ky)IMG_0871 (by gareth.ky)

On two of those pads add an additional hole clear of the blind nut. This is the setup pin hole. The setup pin will keep the wings level when the anti-rotation bolts are removed. This is handy while you look around for your socket driver at the field. Its just an affordance for setup & tear-down and not a load bearing part.

IMG_0874 (by gareth.ky)

Next find the root cap stock with the pre-drilled socket tube holes in it. Mark the center line of the plank and then transfer the locations of the mounting pads to the center line. Use one of the pads and a square to mark the locations of the pads. Cut these out inside the lines. Sand until the pads are a snug fit.

IMG_0876 (by gareth.ky)

Install the blind nuts in the wing pads. Place the pads into the root cap holes you just cut. The setup pin hole should be pointing towards the tail. Tack glue the pads with some CA. I just did the 4 corners. I’m using polyurethane glue to install the root cap so it will make a good bond later on. Cut the root cap stock in half to make two root caps.

IMG_0877 (by gareth.ky)

For each wing we need to glue in the wing root cap. To do you have to cut away some of the foam so that the pads are recessed into the wing root. To do this I just fir the root cap over the socket tube and line it up with the center of the airfoil using the center line I drew earlier. Once its aligned I press the pads into the foam so it leaves a mark. Using a Dremel router I cut a deep pocket behind the blind nut so that no glue could enter the back of the nut. Then I set the router to cut the depth of recess needed for the pad and cut out the shape of the square mount pads. Test fit again and it should be good to go. Sand down the tube socket so that its flush with the root cap or even slightly inset.

IMG_0879 (by gareth.ky)IMG_0881 (by gareth.ky)IMG_0882 (by gareth.ky)

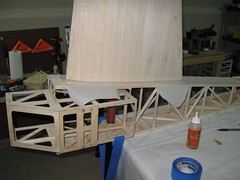
Now to get a good fit between the wing root and the fuse sides. I think I saw this on FG somewhere else and it didn’t look like it could hurt. Flip the fuse on its side, put the wing tube through the fuse and mount one of the wings on top. I use polyurethane glue to attach the root cap. Make sure to get adequate glue around the ply mounting pads. Glue is going to come through the seams where the mounting pads are so put some parchment paper between the fuse and the wing to keep it from sticking. The glue takes 2 hours to set up so this step takes a while. You may want to label the wings left & right at this time because its hard to tell which is which after the root cap is on.

IMG_0888 (by gareth.ky) IMG_0894IMG_0893 (by gareth.ky)

Resist the urge to trim the root caps, all that extra material is going to come in handy. So now its time to set the incidences. Use a good digital level and an incidence tool. Make sure your table is flat and level. Mount both wings on the fuse with the fuse flat on the table and upside down. Make sure that you got the right wing on the right side of the aircraft and that its underside is facing up. Use the incidence tool to find 0.0 incidence. Use a block of scrap balsa and some push pins to secure the wing in this position. Make sure at least one of the pins goes through the 3/8 square stock in the fuse sides. The soft balsa on the fuse sides is too flimsy to hold the wing and keep it from slipping. Take you hands off everything and verify the level still reads 0. Set both wings this way. The blocks will allow us to move the wing and find 0 incidence again consistently.

IMG_0897 (by gareth.ky)IMG_0902 (by gareth.ky)

Now we have to find the locations of those blind nuts so we can bore a hole in the fuse side to match up with it. I have seen various methods suggested using tape or sharpened screws. This way is easier and, IMHO, more accurate. Use a pin to probe for the hole from inside the fuse. Don’t worry, the pin cant go through the ply block in the wing root so it can’t make big holes in the exterior of the fuse sides. Just the tip goes through the balsa, not the whole thing. The holes on the inside get covered up later. Once you strike pay dirt poke more holes all around to find the extent of the blind nut hole. This will help you see the center when you pull the wings off.

IMG_0899 (by gareth.ky)IMG_0915 (by gareth.ky)

Pull the wings off and you should see spots on the fuse sides peppered with holes. Open up the center of each area with a pin or small drill bit. Make a sand paper drill from 220 grit paper and drill the holes but twirling it. Open up the hole until its the size of the perforated area. Slide the wings back on and check that all the blind nuts are accessible. You should also make holes for the setup pins at this time.

IMG_0916 (by gareth.ky) IMG_0903 (by gareth.ky)IMG_0917 (by gareth.ky) IMG_0908 (by gareth.ky)

Now we glue the 4 remaining mounting pads to the inside of the fuse. The is the *critical* step. Once they are glued in the incidence of the wing is set and you cant change it. I do one wing at a time so I can have the incidence meter to make sure the wing is at 0. Use 30 minute epoxy, not poly glue, for this step. The poly glue could expand and seize the bolt. Put the epoxy on the back of the pads and screw them in place. Do not tighten the bolts down, just snug them. Check once again that the wing reads 0, it might shift when the bolts go in but I didn’t have this problem. Then just walk away. Wait till the epoxy has cured before moving anything.

IMG_0920 (by gareth.ky)IMG_0927 (by gareth.ky)

Now its time to mount the setup pin. Make the pin about 3 inches long and use poly glue to install it in the wing. You only need it to stick out about 3/8″. If you leave it a little bit longer you can sand it down so its flush with the mount pad inside the fuse when the wing is installed. You may want to harden up the balsa around the setup pin opening with some thin CA. You’ll have to drill a hole in the mounting pad in the fuse side to match up with the pin. I strongly suggest doing this on a drill press. I tried it with a hand drill but the wood tends to ‘climb’ up the drill and mess things up. The drill press took more time but the result was much cleaner.

IMG_0930 (by gareth.ky)IMG_0931 (by gareth.ky)

Last step, add the balsa spacer and the retention bands. This is pretty easy, just glue the parts in place. You’ll probably have to sand and shape the two forward bands to fit. Again I used 30 min epoxy so it didn’t get into the bolts.

This is the after shot, both wings still read 0.0 degrees. There is not slop or wobble at all. The bolts fit but are very snug and its a bit of a challenge to get them engaged properly. I’m going to put a few flight on the airplane and see if things sort of shake/wear into position. I don’t want to mess up a good things with sand paper just yet.

IMG_0936 (by gareth.ky)

Drawing Foamies in Sketchup: Tips & Tricks

Bet you thought I was gonna write about snow. It was cold, I’m over it.

I have been putting some serious time into Sketchup for a new project. Since nobody on RC Groups reads this blog I think I can get away with posting pics of it here as examples before I mention it over there. Ok, on with the tips:

Make components of everything symmetrical. I do half the wing, half the elevator, half of the sides etc. Don’t duplicate anything, just make a component and copy it. Here you can see a shot of the new project and what you see is exactly 1 of each component in the drawing. This is the best way to cut down on your workload.

One of Each Component

If something would be more convenient as a whole object, say a whole wing or the elevator use make a group out of them. This way they can be selected and manipulated as if they were one component without the duplicated geometry penalty. The Outliner is your friend here. You can rename groups and rearrange the group hierarchy in the outliner.

Sketchup makes it really easy to extrude things into 3D. Resist the temptation to make all your parts 3D. In the long run its just so much easier to manipulate things in a 2D plane than in 3D. It will save you a lot of work. You can place everything in 3D of course but you have to remember to keep things the right distance apart (3mm or 6mm depending on the depron or foam thickness your shooting for). You run into so many problems making geometry changes in 3D that its just safer to keep everything in 2D. If you have something complicated that would be easier to work out if everything were in 3d try making a copy of all the components and use the “Make Unique” option so your changes wont affect anything else. Usually you can work it out in 3D and then copy the changes back to the 2D parts.

Outliner

If stuff suddenly stops forming nice surfaces its because all the points are not in a plane. Finding the offending point or points can be hard. A quick trick to see which points are off the plane is to use the scale tool on the component. If the scale tool even lets you stretch the component vertically its not a flat surface. Stretch it vertically and the high points will be exaggerated and you can find them easily. Here is an example where one of the circles is 0.1mm higher than the rest. Hard to see but with the scale tool its easy.

Use Scale Tool to Find Points Not On A Plane

Don’t embed cut out marks in your components treat them like an overlay instead. It took me a while to grok why this is important. At first I was applying lightening holes and assembly cutouts right to the component geometry. This had lots of undesirable effects, It broke up the geometry and making changes was very involved. Now I apply cutouts as an overlay using a separate component. Then I group the cutouts and the main component together. Now I can play with changing the construction cutouts without affecting the component geometry. Also things like lightening holes that are supposed to be very similar can be a single replicated component. You can even lay them down with the move/copy tool. Another bonus us that scaling now works correctly. If you have a 3mm cutout in your component is probably a hard value that you don’t want to scale if you scale the component. Just extract all of that stuff out into a separate component and it wont scale. This is great for shrinking or stretching plans.

I gave up on doing tiled plans. Sketchup doesn’t support it natively and there is no good solution that I have seen yet. You can print plans at Kinkos on the large format printer and save yourself the trouble. The large format black and white printer will print up to 36″ or 90cm wide by however long you need, It’s a drum fed laser. An F3P model will cost you between $8 and $10 depending on how well you use the space. If Sketchup suddenly supports this i may reconsider but having the plans printed is very convenient.

Plan Layouts

Lastly get Bezier.rb before you get too involved in doing any curves. When its correctly activated you’ll find it in the menu; Draw ->Bezier Curves. This is the secret to nice bubble canopies and the other tricky curvy bits. Its a must have. I just wish it was in there from the beginning and it had an icon in the toolbox. Just assign it a hot key (I made mine ‘C’ since its rare that I draw a circle).

My biggest Sketchup time saver? The Spacebar is the default shortcut to get back to selection mode from whatever tool you using.

Look for plans of the new airplane as soon as I get one built and tested. At the rate I’m getting things built and flown it might not be till late January.

Breeze F3P

Design for a Full Fuse Biplane for F3P/F3AI Competition

In the spirit of free beer and open source these plans are made available under the Creative Commons Attribution-ShareAlike license. Go check out the Breeze F3P thread on RC Groups.

Breeze F3P Photo Set Breeze F3P - From the Back

See a video of the Breeze in flight.

Specs

Length: 920 mm
Span: 862 mm
Wing Area: 29.76 dm²
Side Area: 14.28 dm²
Aspect Ratio (S²/A): 4.99
Target Weight: 180g
Wing Loading: 6.0 g/dm²

Plans

Plans and past version; see the plans page

Suggested Equipment

  • Axi 2204 or similar 20g-25g motor
  • 2s 300mah – 450mah battery
  • 3 x 6g servos (BMS 306 or Hitec HS-50)
  • 4 channel receiver
  • Speed control good for at least 6 amps (e.g. Thunderbird 9)
  • 20-25g 2s Lipo battery

Materials Needed

  • 3 sheets 3mm Depron (36×27)
  • Carbon Rod for Landing gear; 1.5mm
  • Light Weight Wheels
  • Pull-Pull Control Horns
  • Kevlar Thread
  • Velcro for mounting batteries
  • Heat shrink for aileron pushrods
  • CA Hinge Material (for empennage)
  • Hinge Tape
  • Foam Glue & Thin CA

Design Considerations:

I wanted the parts to be easy to cut by hand since its going to be built from scratch. The number of curves and the total part count was kept to a minimum. The Breeze has an aspect ratio similar to the Donuts-Models biplanes. It has generous side area and large interplane struts for good knife edge performance. Keeping weight below the weight target will, of course, improve performance.

iTunes Folder Sync

You can manipulate iTunes on Windows with Javascript! This was a shock & a relief to me, on Mac OS they have Apple Script but I thought we were SOL on Windows. Anyway this has helped me fix one of the most vexing problems with iTunes: It can’t find new music on your hard drive automatically.

The Problem: iTunes Music Library isn’t as super fly as Winamp’s just yet. With Winamp you can store your music in any way you like, say: full albums in their own folder, singles in their own folders separated by genre. Winamp scans these folders (as many as you want) on startup looking for anything new. New music is automatically added to the Winamp library, not so with iTunes. You have to go in and re-import each folder. So I was looking for a way to make iTunes do this automagically.

The Solution: iTunesFolderSync.js

The script performs the following tasks:

  • Scans all your library and remove any tracks that iTunes cannot find on your hard drive.
  • Collect a list of all the folders you store music in.
  • Import all those folders back into iTunes, catching all the new stuff in the process.
  • Initiate a sync with your iPod if one is attached.
  • Lets you know how many tracks were added and removed from the library.

Folder Sync is great for getting new stuff into iTunes that you have just downloaded, like podcasts. Its also great when you are organising your music, moving/renaming files and you want to sync up the library. You can have the script run after downloading podcasts using iPodder.

Technical Notes:

  • You need the Windows Scripting Host and the .js extension set to be executed using \windows\system32\wscript.exe
  • If you have music in formats that iTunes cannot read you will be asked to convert those tracks, even if they already exist in the library. The best thing to do here is to convert the tracks once and replace the originals with the conversions. This way you won’t get asked twice. You could also by lazy and just press ‘skip’.
  • The iTunes SDK is here for you more intrepid hackers. You don’t need the SDK to run the script though.